How To Draw A Tlc Plate
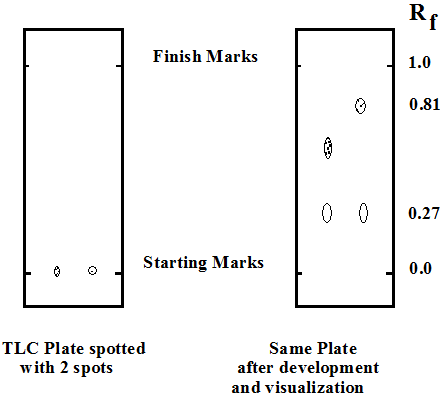
The lanes can be populated with spots of different Rf size shape or color. The lower edge of the plate is then dipped in a solvent.
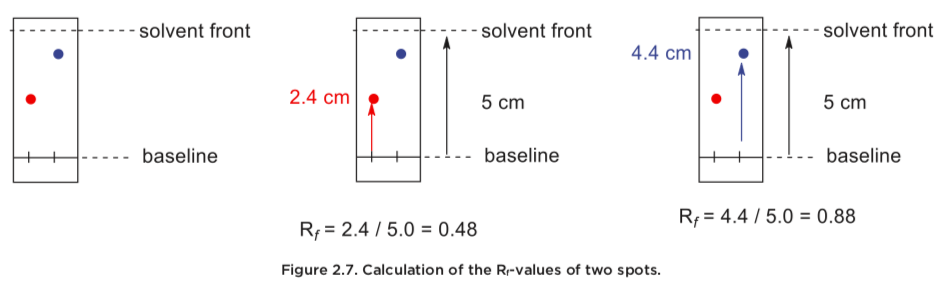
2 4 Tlc Analysis Chemistry Libretexts
Heat guns are not simple hair dryers and can get quite hot.
How to draw a tlc plate. Using a Pasteur pipet. 1 Cut TLC plates. The number of lanes is a function of the width of the plate you create.
Draw a light pencil line about 13 to 12 inch from the bottom of one plate. Before scoring the glass use a ruler and a pencil to lightly mark baselines on the silica side of the plate be careful not to remove any silica from the plate. Using a pen instead of a pencil to draw a start line might cause this as the ink can travel with the solvent system on the TLC plate.
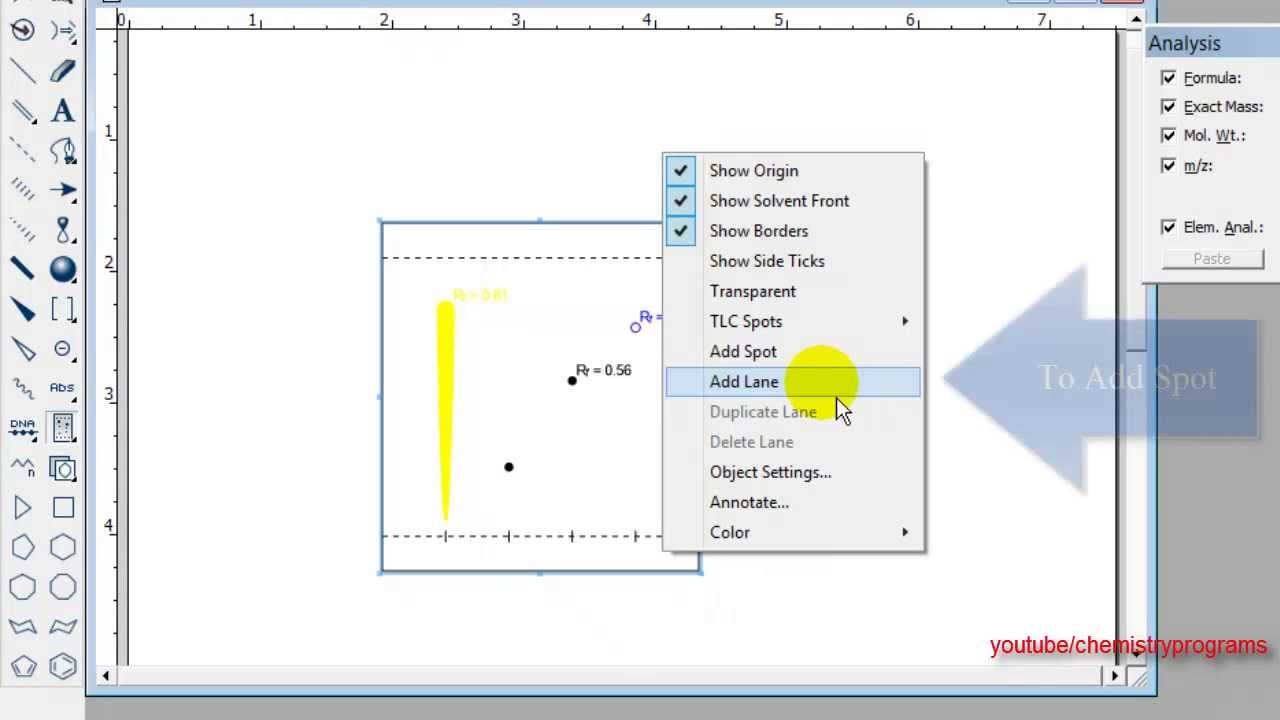
Drag in any direction from the point of origin. The tool creates a rectangular plate with origin line solvent front and one or more lanes. Select the TLC tool.
Draw a pencil line about a 14 inch from the bottom of the plate along the short side. Close the lid or place the watch glass and tilt the chamber to wet the filter paper. Allow the plate to develop until the solvent is about half a centimeter below the top of the plate.
Thin-layer chromatography TLC is a technique used to separate non-volatile mixtures. Dip the capillary into the solution and gently and quickly place a 1-2 millimeter spot on the plate at the position youve marked. Click on the Edition.
The solvent moves up the plate by capillary action meets the sample mixture and carries it up the plate elutes the sample. How to run a TLC plate student guide 1. The solvent level has to be below the starting line of the TLC otherwise the spots will dissolve away.
Usually silica plates are bought as square glass pieces that must be cut using a diamond tipped glass cutter and following a template. The solvent will rise up the TLC plate by capillary action. Obtain a TLC plate touching the plate only on the back or edges but not on the white surface.
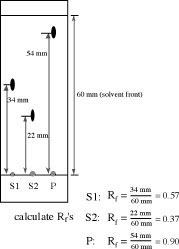
Keep the cap on the jar at all times except when placing the plate into or taking the plate out of the jar. The solvent must be below the level of the spots or the spotted material. Using a pencil carefully draw your spotting points on the plate about 1 cm from the bottomCarefully draw a line 50 mm from your spotting points.
Do not gouge the silica or alumina. This video is about tlc plate chem draw. Plastic-backed silica TLC plates 25 x 75 cm will be provided.
TLC Plate Draw TLC plates with multiple lanes and adjustable solvent front and spots. Make sure the solvent does not cover the spot. Is the complete drawing tool of choice for chemists and.
To create a TLC plate. TLC and Gel Electrophoresis plate drawing. The TLC plate is then placed in the chamber so that the spot s of the sample do not touch the surface of the eluent in the chamber and the lid is closed.
Several Unexpected Spots Seen. The high setting can be used at first with the setting turned to low if the plate begins to char. Lab equipment templates and handy TLC and Gel Electrophoresis Plate.
Be sure you handle these by the edges. Place the TLC plate into the jar with the spotted side at the bottom. 1 800 315-7300 1 617 588-9300 Fax.
The new tool which has been added to the main toolbar to draw Thin Layer Chromatography TLC Plates has been applauded with comments such as The new TLC stuff is cool completely intuitive and I love the TLC featurevery well doneWhen the TLC tool is selected the user can drag within an empty area of the document to create a rectangular TLC plate. Estimate dont measure all youre doing is marking the starting point it just has to be high. Use a rule to lightly draw a straight line with a pencil 3 roughly 1 cm from the bottom.
This will be the solvent front when youremove the plate from the development tank. Mark places along the line for each spot pure reference spots and your mixture. Watch out for the following.
If using a heat gun hold the TLC plate with forceps and wave the heat gun back and forth onto the front of the plate. Each TLC plate has one or more. Place a small amount of solvent mobile phase in the container.
Place the prepared TLC plate in the developing beaker cover the beaker with the watch glass and leave it undisturbed on your bench top. Fluorescent TLC plate under an ultraviolet UV light. Developing a Plate A TLC plate can be developed in a beaker or closed jar see picture below.
Dropping organic compounds accidentally on the TLC plate or touching the surface of the plate while handling it might result in unexpected spots upon developing the plate.
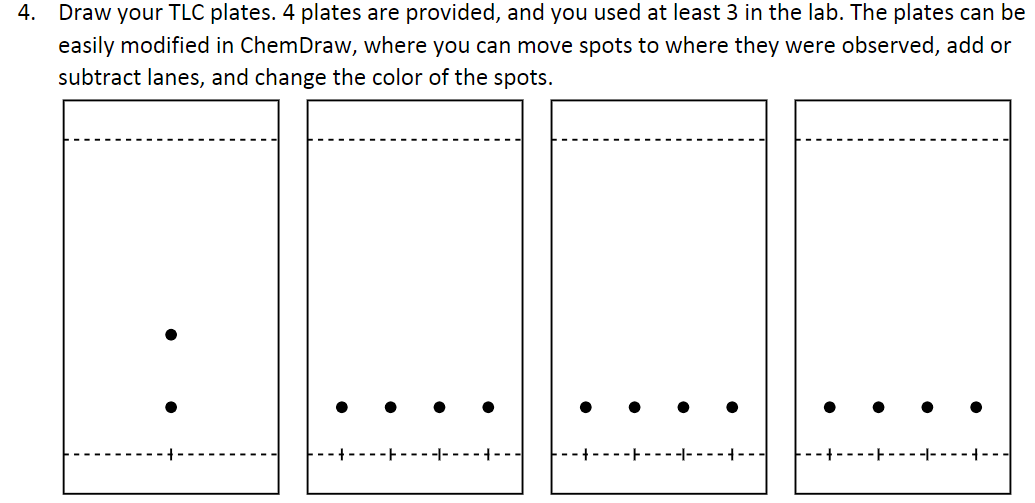
Draw Your Tlc Plates 4 Plates Are Provided And You Chegg Com
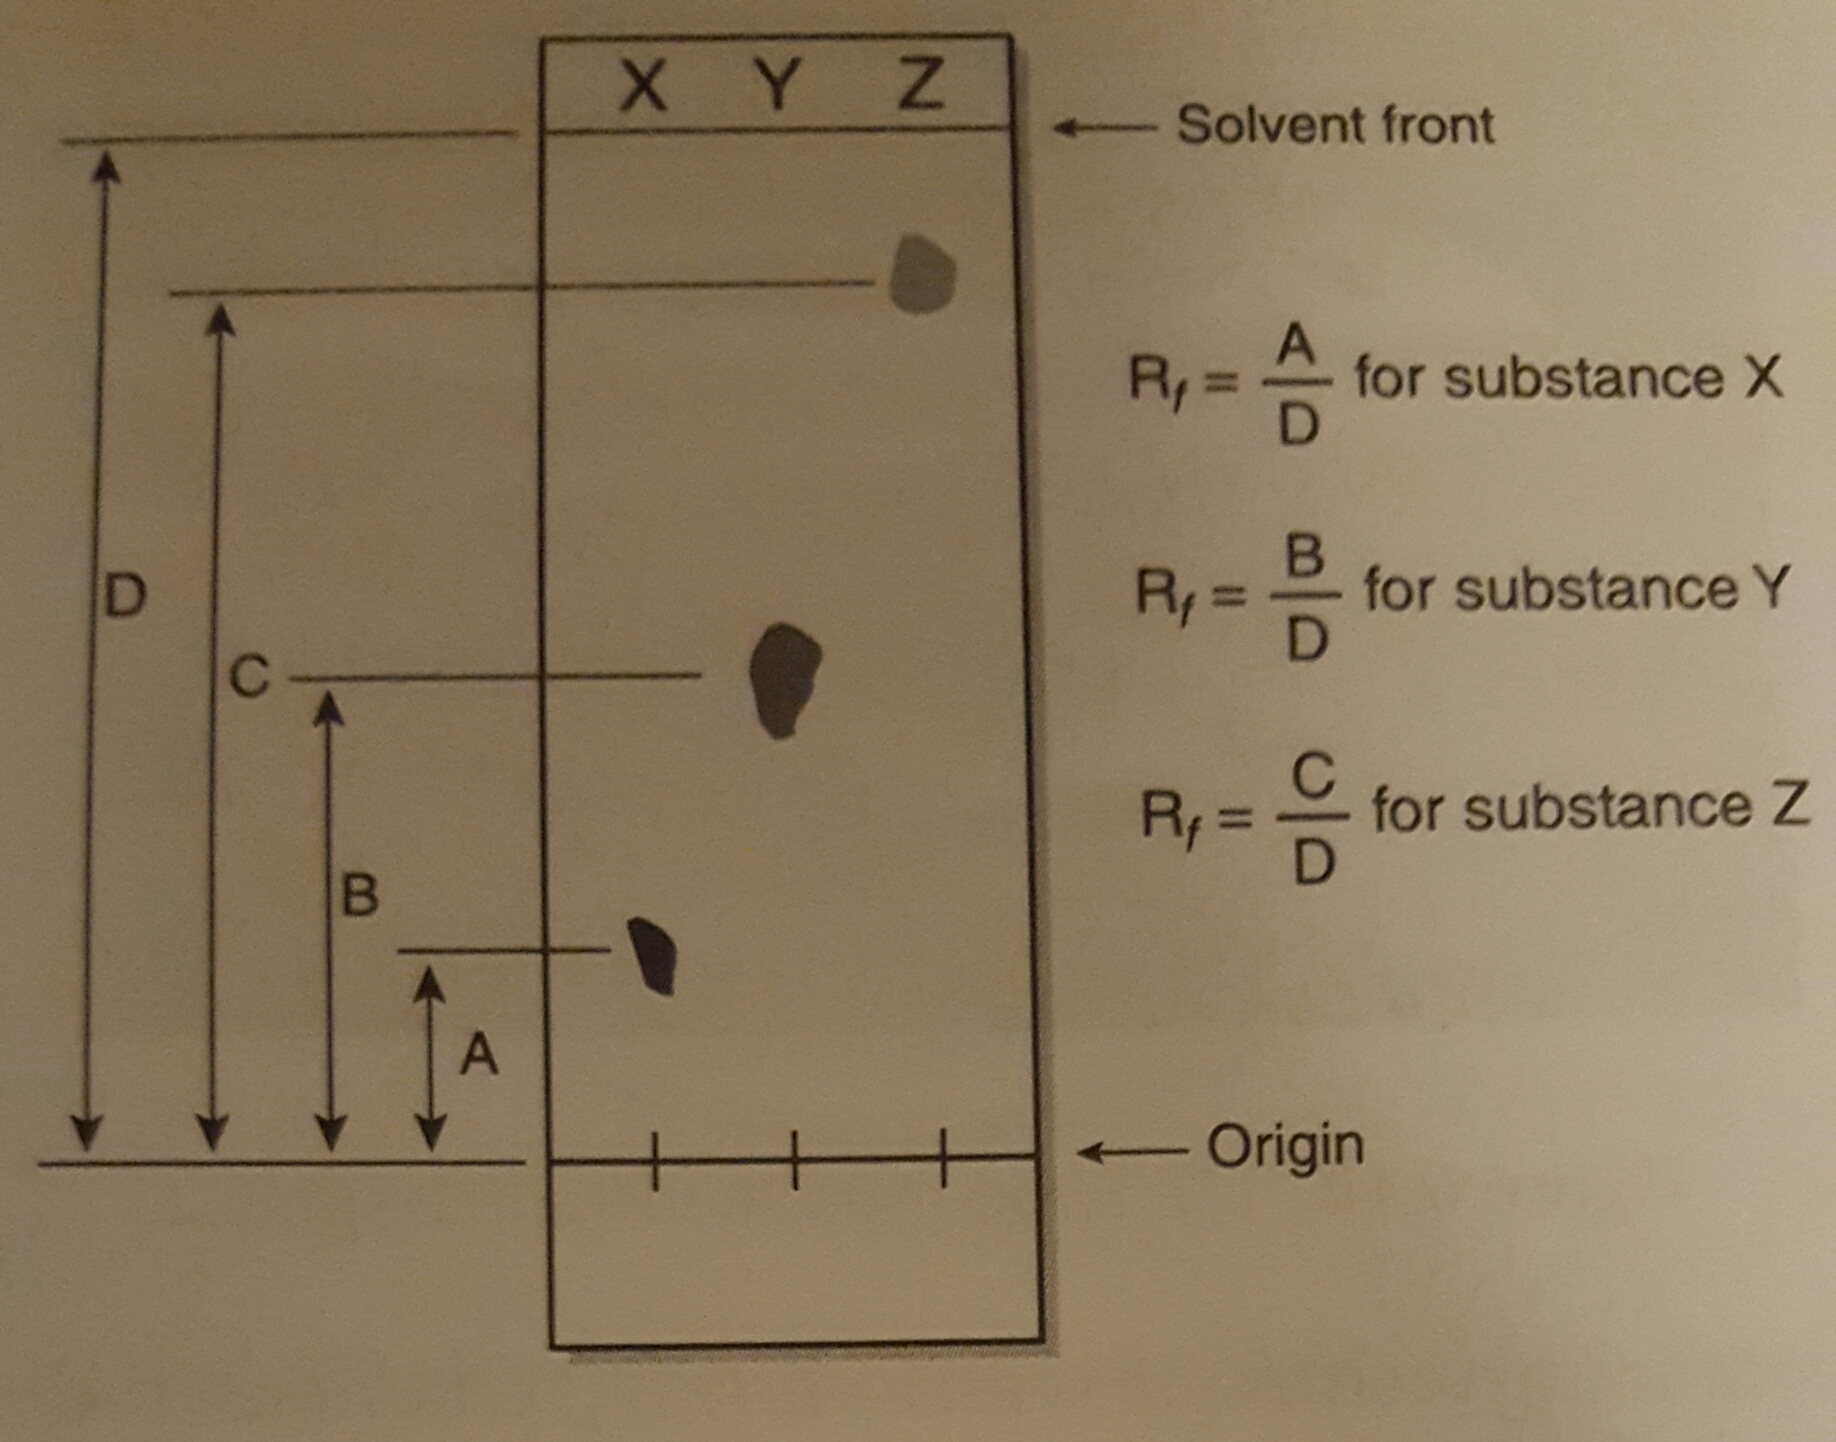
Draw A Diagram Of A Tlc Plate On The Diagram Locate Chegg Com

Thin Layer Chromatography

Tips And Tricks For The Lab Column Choices Education Chemistryviews Thin Layer Chromatography Paper Chromatography Tlc
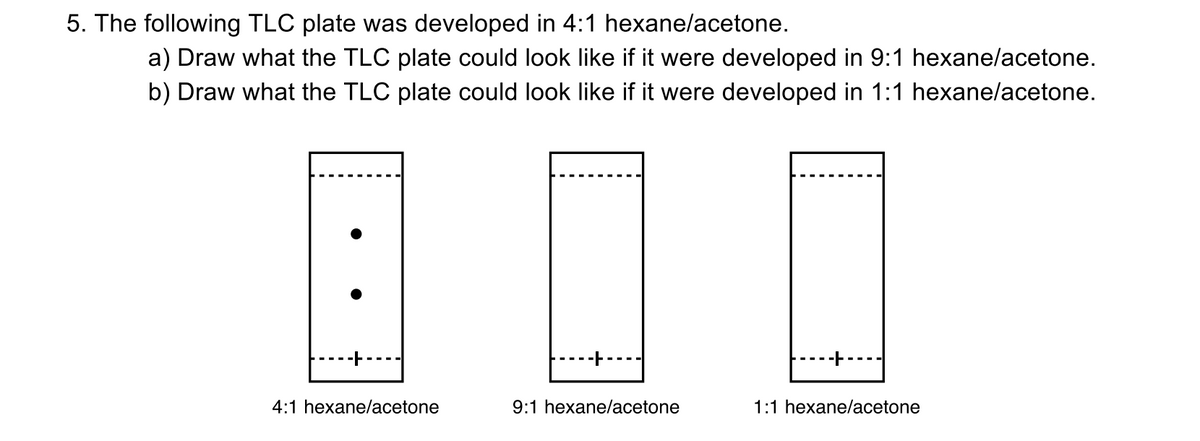
Answered 5 The Following Tlc Plate Was Bartleby
Printer Friendly Version
Thin Layer Chromatography Tlc Mendelset
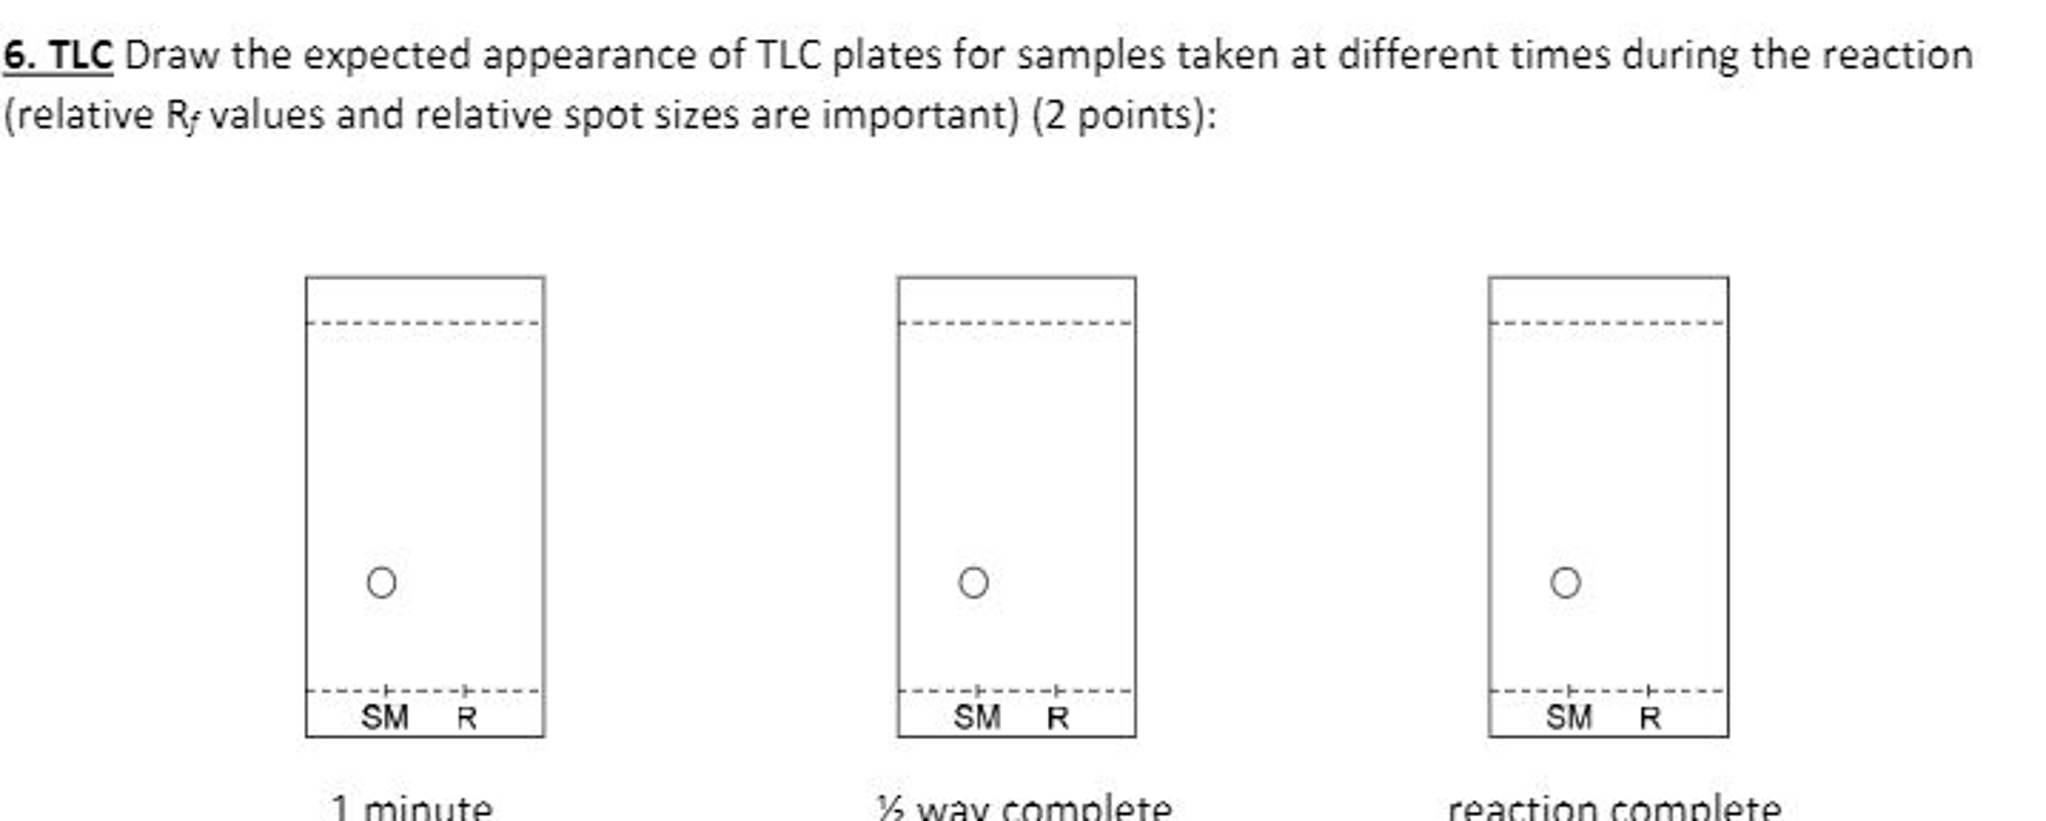
Draw The Expected Appearance Of Tlc Plates For Chegg Com

5 1 Spot The Tlc Plate Youtube
Lab 1 Thin Layer Chromatography
.png?revision=1&size=bestfit&width=1110&height=446)
2 3e Step By Step Procedures For Thin Layer Chromatography Chemistry Libretexts

Tlc Plate Chem Draw Youtube
Chemdraw Tutorial 22 Thin Layer Chromatography Tlc Youtube
Thin Layer Chromatography

Drawing Tlc Plates In Tikz Tex Latex Stack Exchange
/chapter4/pages3and4/page3and4_files/tlcsetup.png)
Chapter 4
Tlc
Thin Layer Chromatography Tlc Chemkey
Tlc Procedure

